 Custom Workflow Tasks
This article describes how to use custom tasks in Zadig system to achieve openness of workflows. The following content includes: How to implement custom tasks and how to use custom tasks.
# Implement Custom Tasks
Encoding implements custom workflow tasks and puts the code and configuration into the library. The following is a description of the print Hello Zadig tasks as an example.
Please refer to the documentation for supported code sources: Code Source Information .
Step 1 : Encoding and implementing the logic of custom tasks and saving them. The source code of this example main.go The content is as follows:
package main

import (
    "fmt"
    "github.com/spf13/viper"
)

const (
	WhoAmI        = "WHO_AM_I"
	WeatherStatus = "WEATHER_STATUS"
)

func main() {
    viper.AutomaticEnv()

    who_am_i := viper.GetString(WhoAmI)
    weather_status := viper.GetString(WeatherStatus)
    fmt.Printf("Hello %s, today is %s", who_am_i, weather_status)
}
2
3
4
5
6
7
8
9
10
11
12
13
14
15
16
17
18
19
Step 2 : Compile the source code, build a mirror and go to the image registry push The relevant commands and Dockerfile references are as follows:
Compile source code commands
CGO_ENABLED=0 GOOS=linux GOARCH=amd64 go build -v -o greeting-bot main.go
Dockerfile content:
FROM alpine/git:v2.30.2

# https://wiki.alpinelinux.org/wiki/Setting_the_timezone
RUN sed -i 's/dl-cdn.alpinelinux.org/mirrors.aliyun.com/g' /etc/apk/repositories && apk add tzdata && \
    cp /usr/share/zoneinfo/Asia/Shanghai /etc/localtime && \
    echo Asia/Shanghai  > /etc/timezone && apk del tzdata

WORKDIR /app
ADD greeting-bot .
ENTRYPOINT ["/app/greeting-bot"]
2
3
4
5
6
7
8
9
10
Mirror construction and push command:
docker build -f Dockerfile --tag koderover.tencentcloudcr.com/koderover-public/greeting-bot:amd64
docker push koderover.tencentcloudcr.com/koderover-public/greeting-bot:amd64
2
Step 3 : Write a task configuration file in the YAML format and submit the YAML file to the code base. The YAML configuration file greeting-bot.yaml of this example is as follows:
name: "Print Hello Zadig"           # Task name
category: "build"                   # Task type
version: "v0.0.1"                   # Task version
description: "Print Hello Zadig"           # Task description
image: koderover.tencentcloudcr.com/koderover-public/greeting-bot:amd64 # The image built in the previous step

inputs:                             # Variables that can be filled in Zadig
  - name: who_am_i                  # Variable name
    description: "who am i"         # Variable description
    type: string                    # Variable type, supports string (single-line text), text (multi-line text) and choice (single-choice)
    default: "Zadig"                # Variable default value
  - name: weather_status
    description: "what's the weather like today"
    type: choice                    # choice variable type
    choice_option:                  # choice variable type optional value
    - "sunny"
    - "cloudy"
    - "rainy"
    default: "sunny"               # choice variable type default value

envs:                               # Environment variables, automatically injected as environment variables when the above image container starts, in addition to envs, cmds and args are also supported
  - name: WHO_AM
    value: $(inputs.who_am_i)       # Environment variable value, using $(inputs.who_am_i) form to represent the input in Zadig
  - name: WEATHER_STATUS
    value: $(inputs.weather_status)
2
3
4
5
6
7
8
9
10
11
12
13
14
15
16
17
18
19
20
21
22
23
24
25
26
The directory structure organization in the code base meets the following forms:
path/to/your/repo                # Code repository root directory
├── greeting-bot                 # Task directory, when there are multiple tasks, they are organized in separate directories
│   └── v0.0.1                   # Version number
│       └── greeting-bot.yaml    # Task YAML file, the file name and task directory name are kept the same
2
3
4
At this point, a complete custom workflow task has been developed, and let’s look at how to use the task.
# Using Custom Tasks
Before using tasks, you need to integrate the code source and image registry in the system and configure the source of workflow tasks:
- Refer to the code source integration to integrate the above code library in Zadig
- Refer to the image registry integration , the image registry corresponding to the image is integrated in Zadig
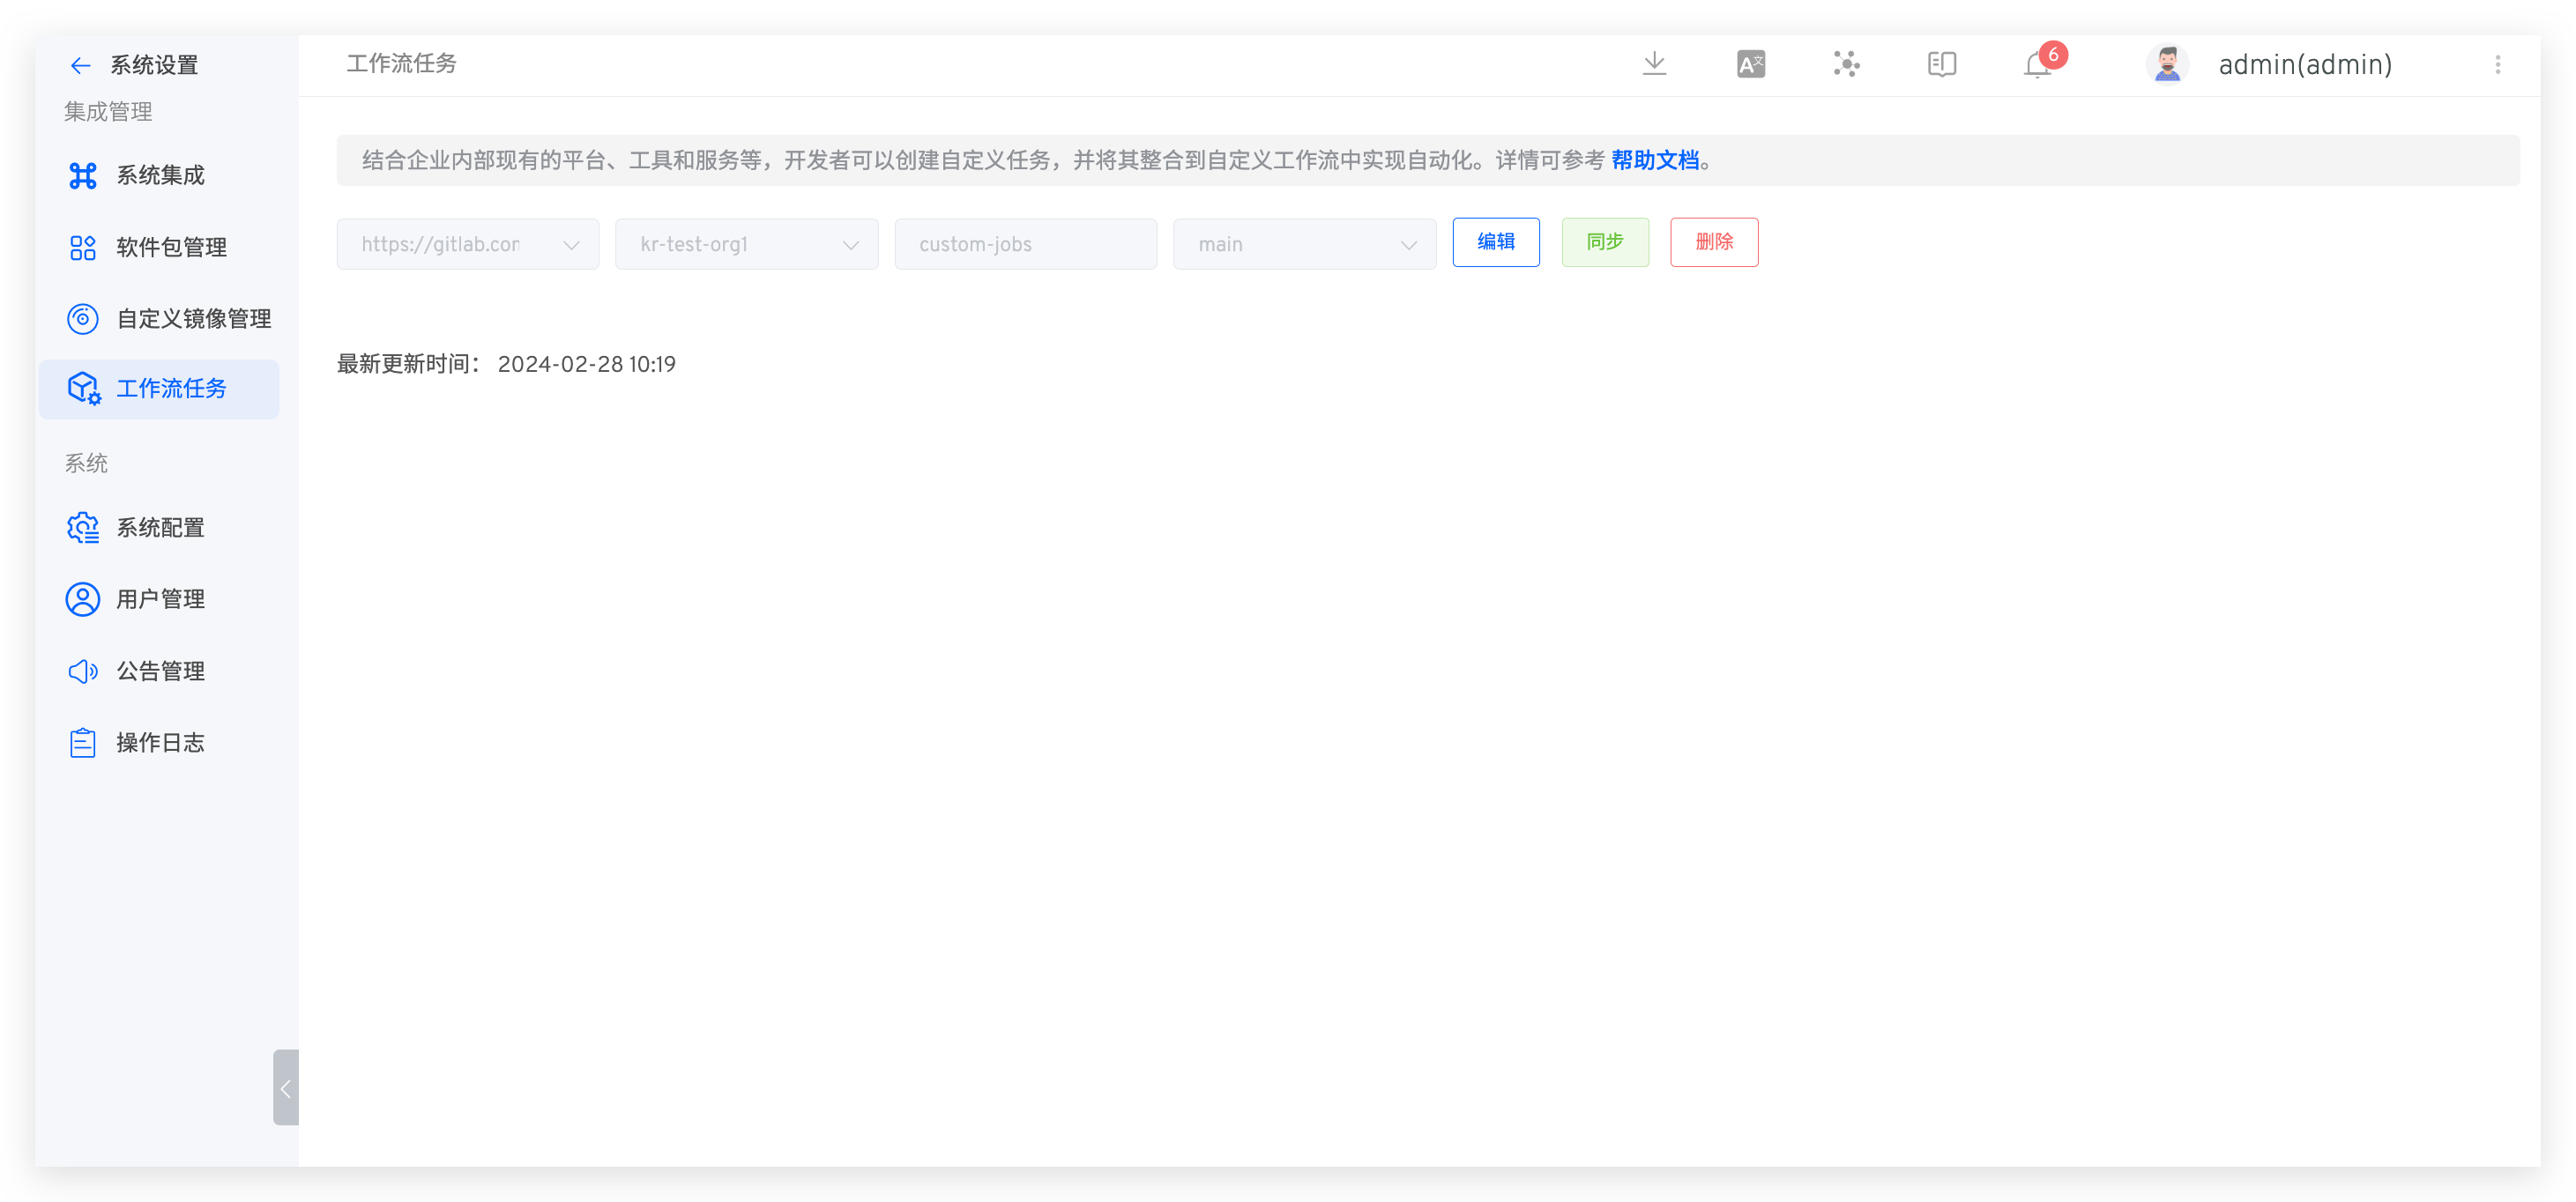
- The system administrator accesses
System Settings->Plugins, configures the code repository, branch and other information and saves it (i.e.: the code repository and branch where the YAML configuration file is located).
If the integration source is successful and the task implementation in the code base is changed, just click
Sync.
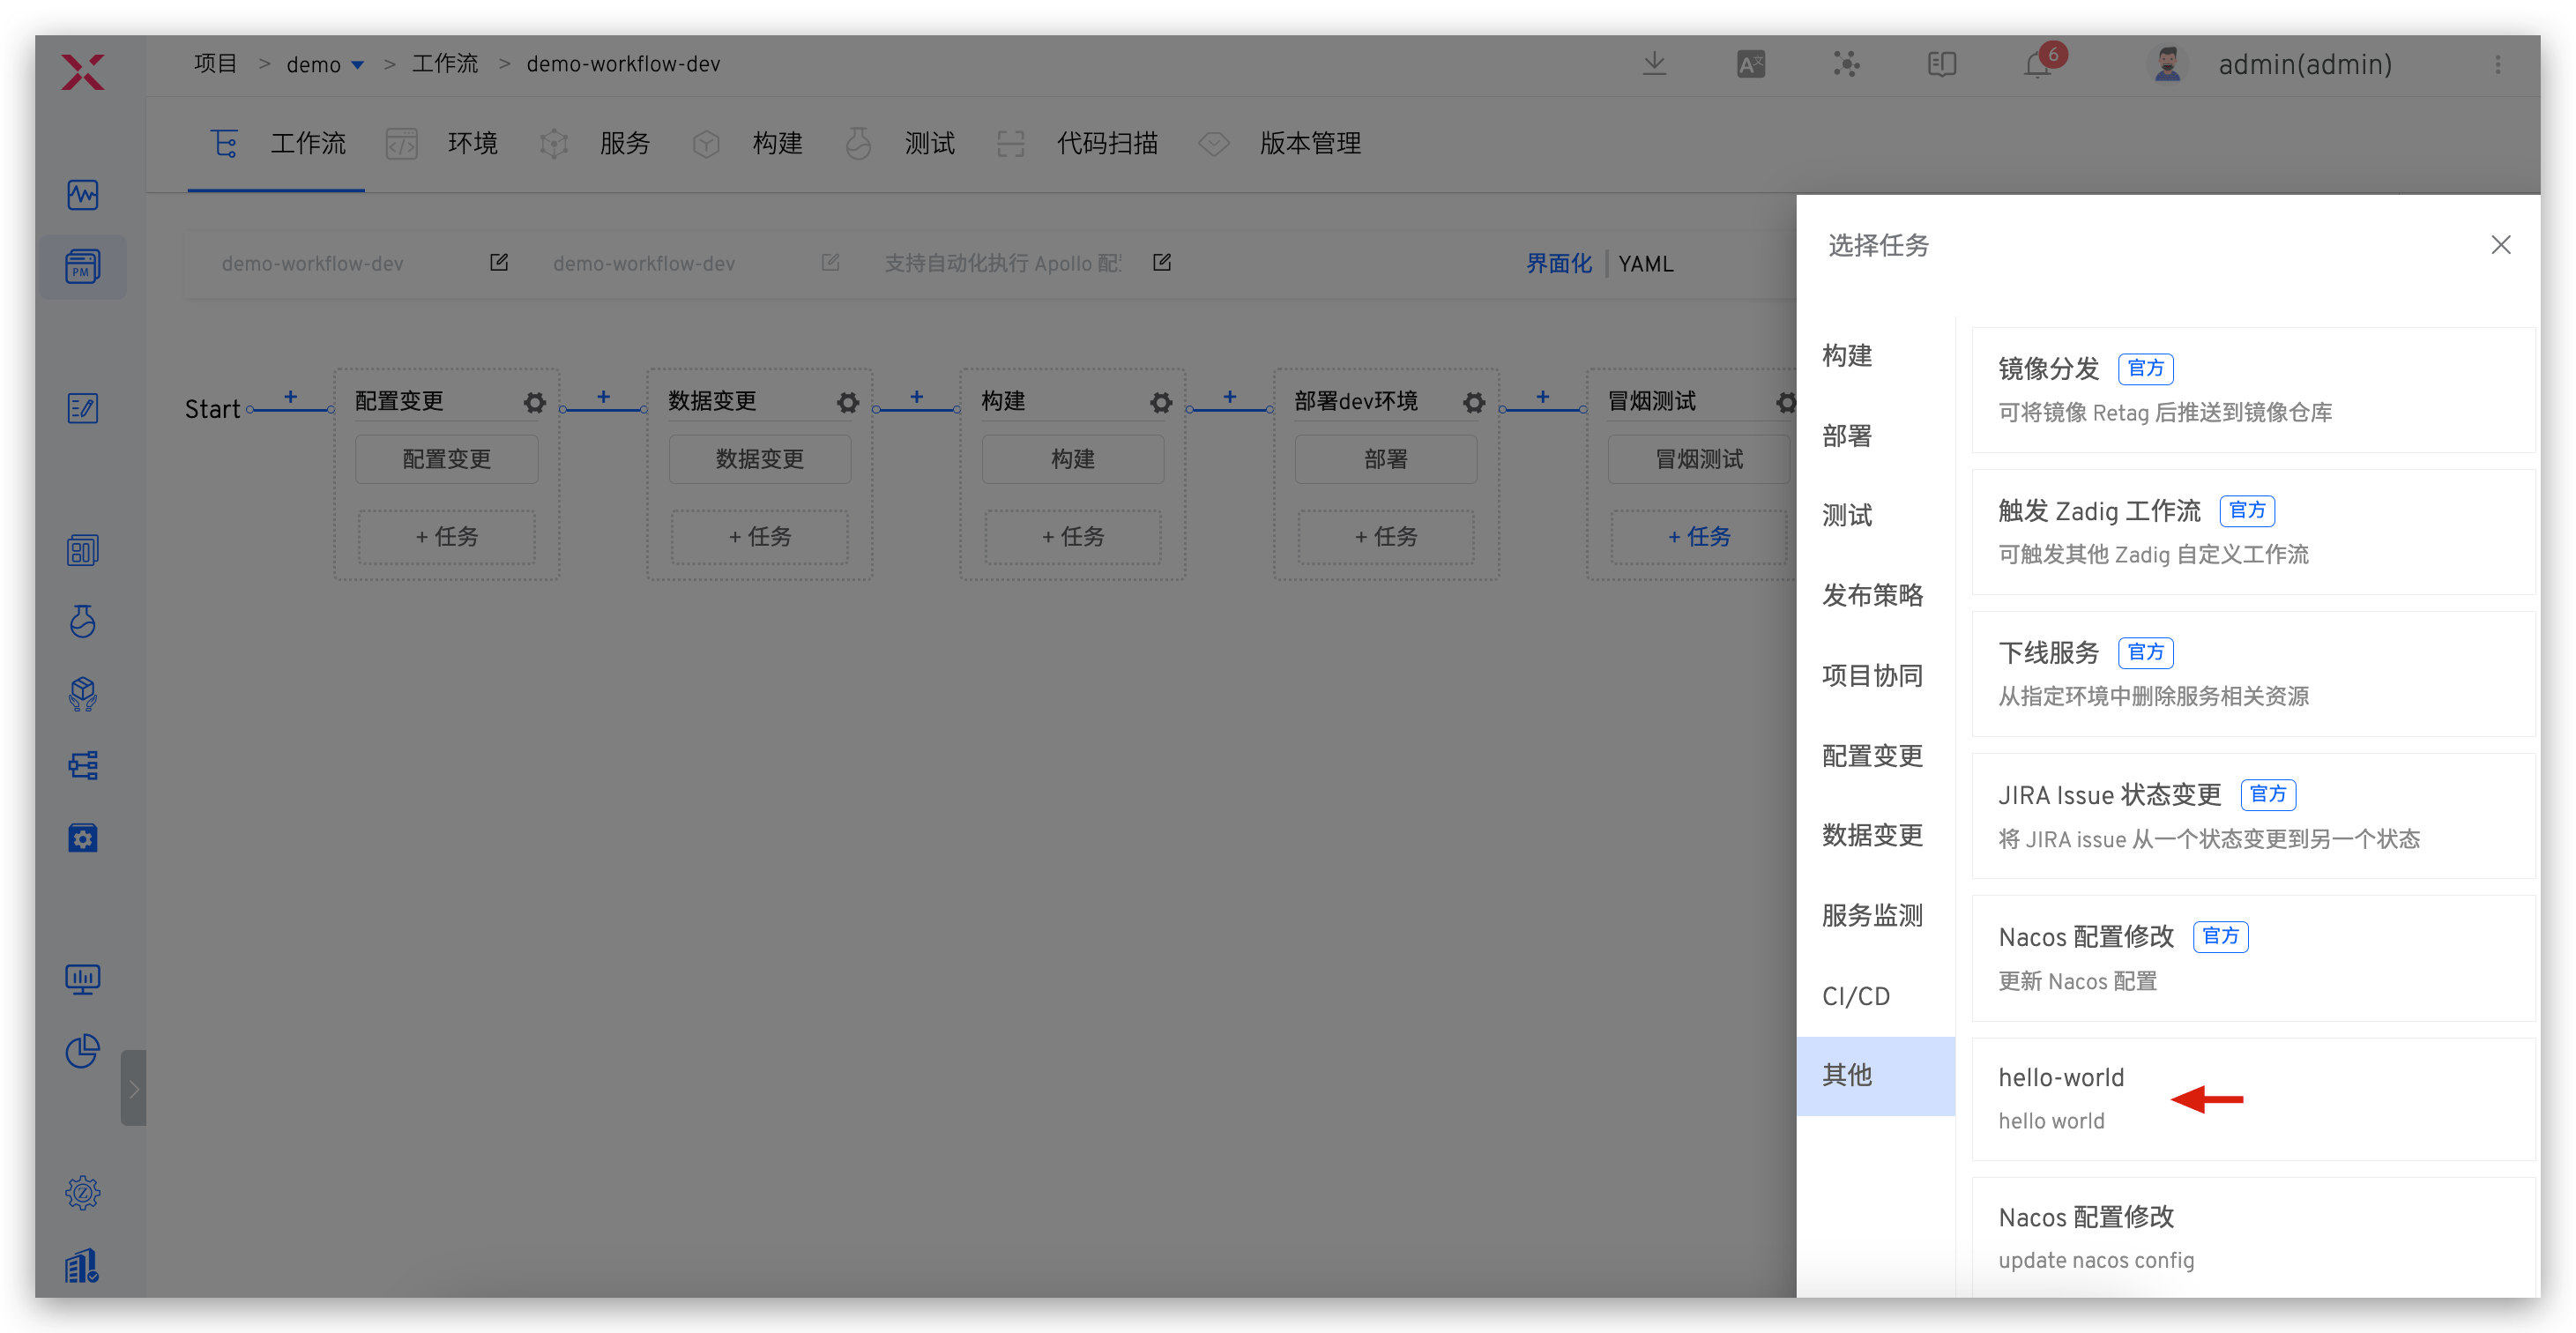
After the configuration is complete, add tasks to the workflow, select tasks and save the workflow. For more advanced functions, please refer to the workflow .

# Task Configuration YAML Syntax
# Basic Information
For example:
name: "Print Hello Zadig"
category: "build"
version: "v0.0.1"
description: "Print Hello Zadig"
image: koderover.tencentcloudcr.com/koderover-public/greeting-bot:amd64
2
3
4
5
Parameter Description:
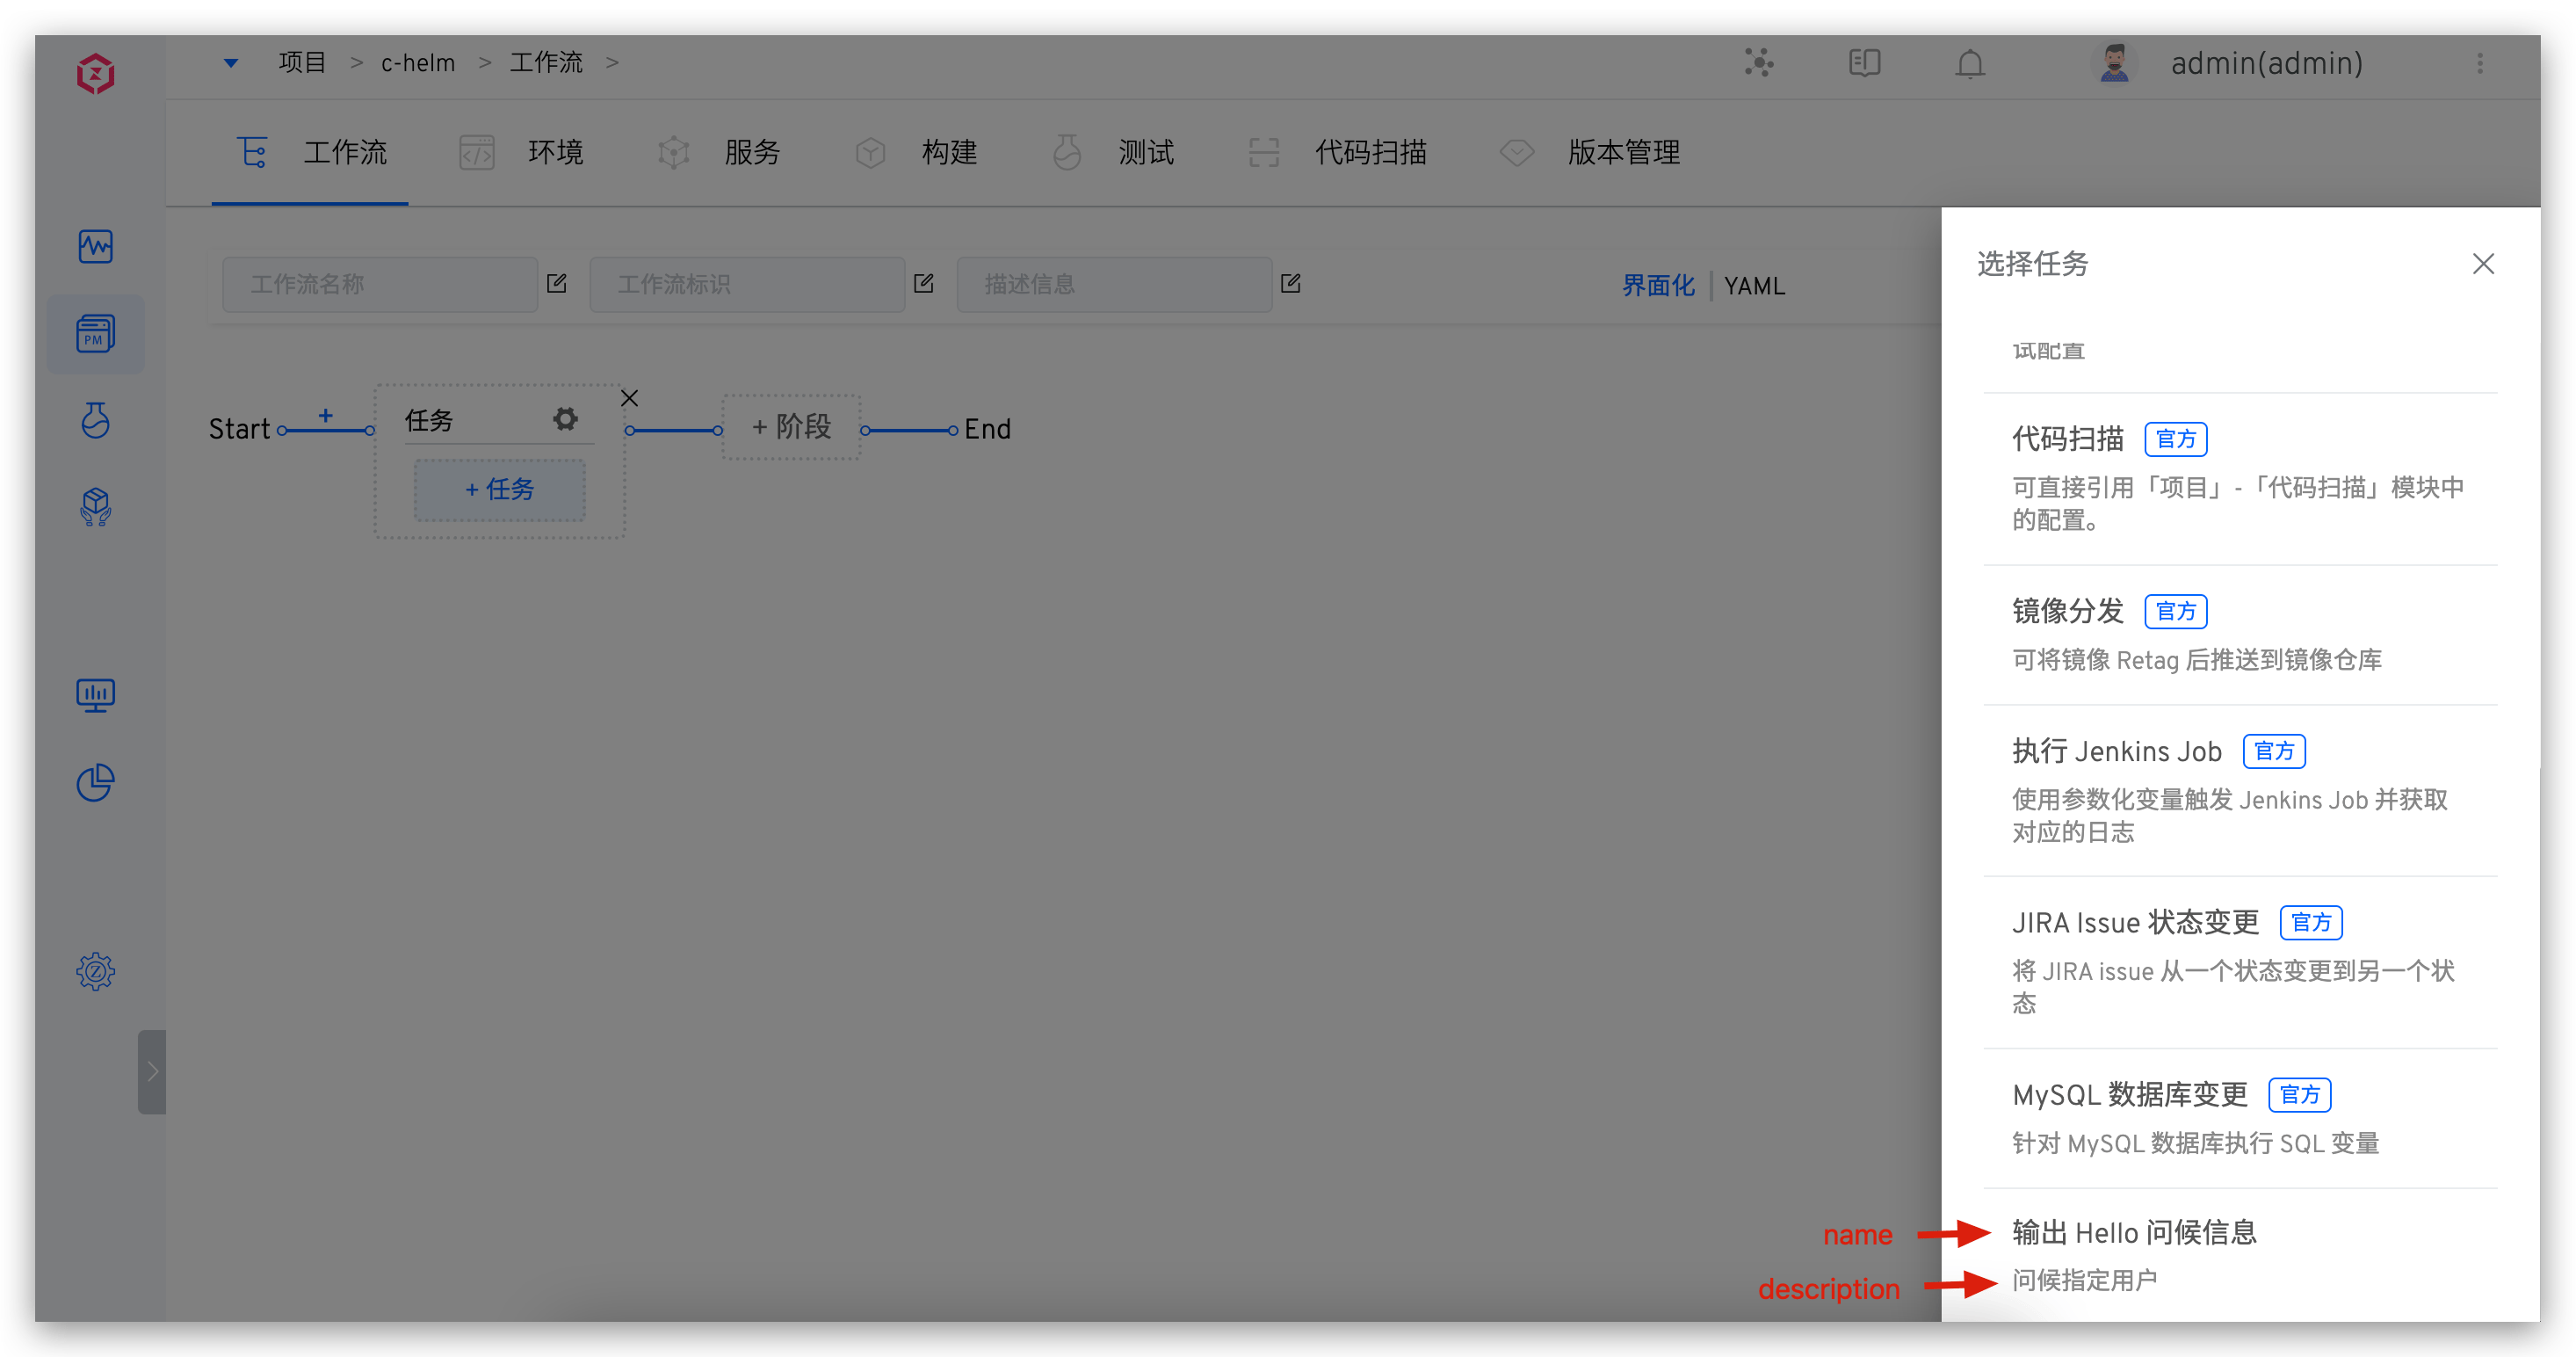
name: Task name, as shown in the figure below.category: Task type, including build (Build), deploy (Deployment), test (Test), project-manager (Project Management), config-change (Configuration Change), data-change (Data Change), release (Publish Policy). Other fields can be entered in double quotes:"This is a custom field"version: The version number of the taskdescription: Task description information, as shown in the figure belowimage: The mirror address of the task
# inputs
inputs is used to define the value of the variable that can be passed into the container when configuring the workflow.
For example:
inputs:
  - name: who_am_i
    description: "who am i"
    type: string
    default: "Zadig"
  - name: weather_status
    description: "what's the weather like today"
    type: choice
    choice_option:
    - "sunny"
    - "cloudy"
    - "rainy"
    default: "sunny"
  - name: script
    description: Dynamic variable
    type: script
    script: |-
      func GetInputVariables(k1, k2, k3 string) []string {
      return []string{k1, k2, k3}
      }
    call_function: GetInputVariables("a", "b", "c")
    default: ""
2
3
4
5
6
7
8
9
10
11
12
13
14
15
16
17
18
19
20
21
22
Parameter Description:
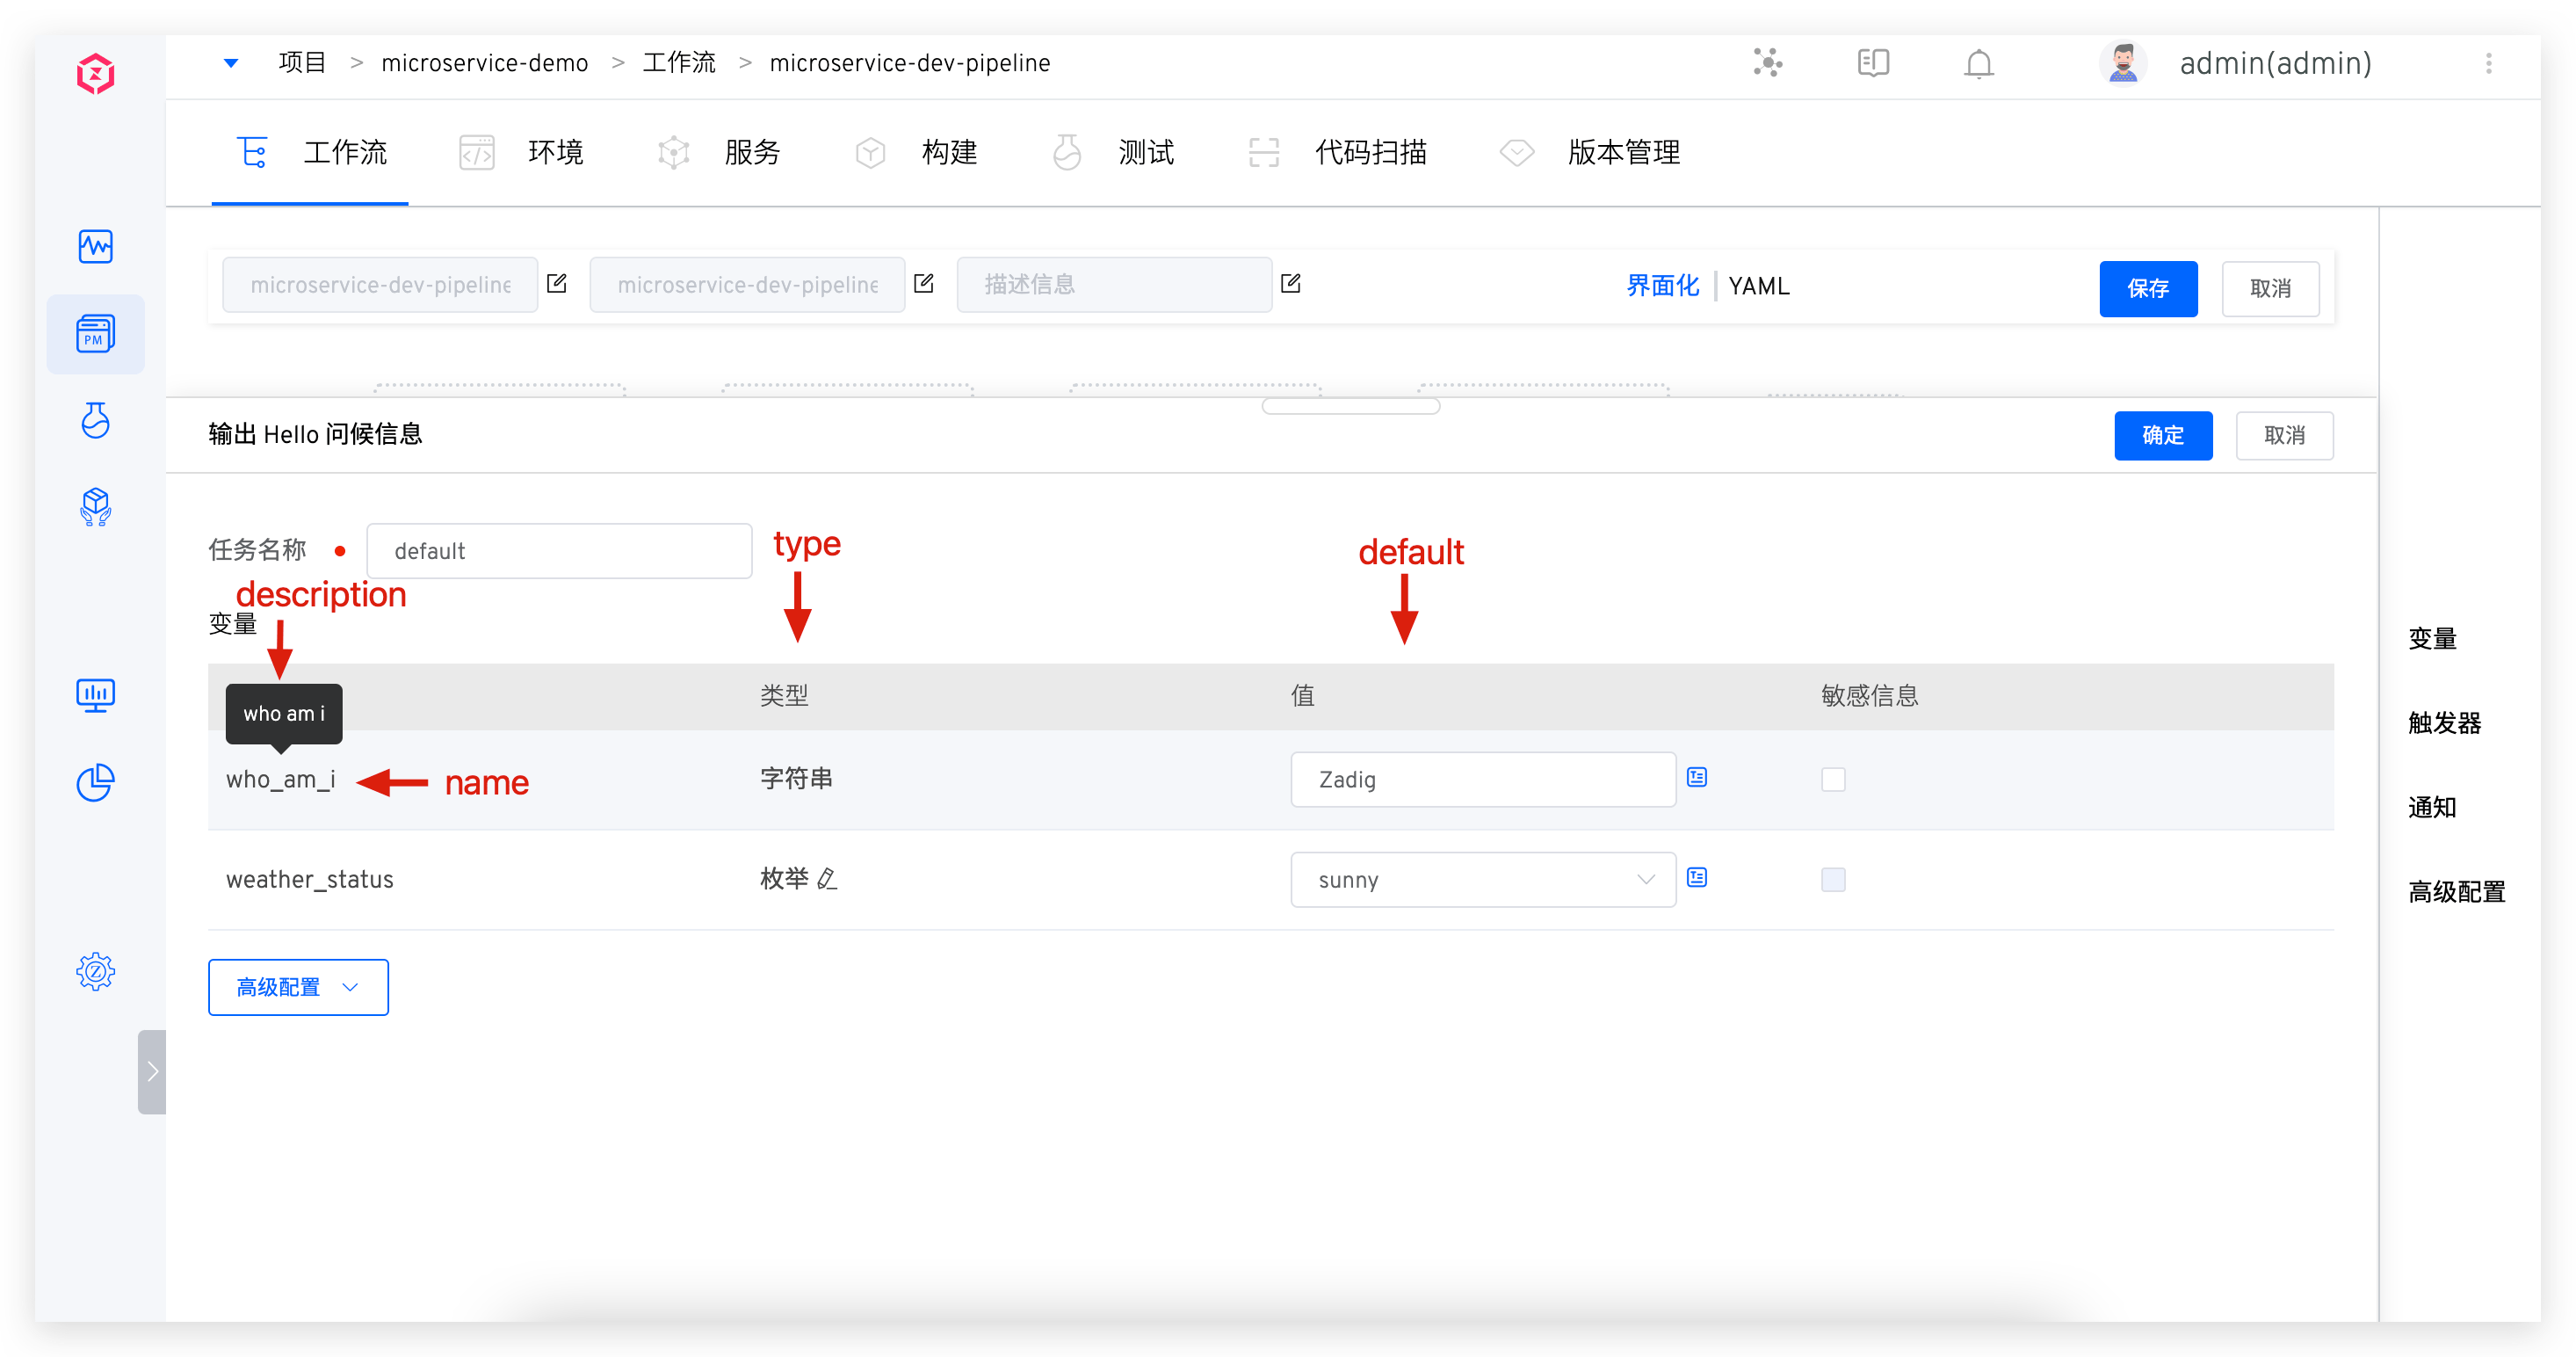
name: Variable namedescription: Description informationtype: Variable type, supported types: string (single-line text), text (multi-line text), choice (single-choice), and script (script)choice_option: When type is choice, optional variable valuescript: When type is script, script contentcall_function: When type is script, call functiondefault: Variable default value
The corresponding relationship between parameters and system fields is shown in the figure below
# envs
The variable information entered when executing a workflow can be passed into the container through envs. When the task container starts, the content configured in envs is automatically injected.
For example:
envs:
  - name: WHO_AM_I
    value: $(inputs.who_am_i)
  - name: WEATHER_STATUS
    value: $(inputs.weather_status)
2
3
4
5
Parameter Description:
name: Environment variable namevalue: Environment variable value, use $ ( inputs.who_am_i ) form to represent the input in Zadig
# cmds and args
If you need to modify the startup command of the container, you can configure the cmds and args parameters.
Give an example
cmds:
- "/bin/sh"
- "-c"
args:
- "echo $(inputs.CONTENT)" # Configuration content supports use $ ( inputs.who_am_i ) Formal parameters
2
3
4
5
# More Demo
The following custom tasks are built-in to be used directly:
Jira Issue Status ChangeZadig Combine the workflow stage to change the Jira Issue status and connect with project management. The source code is located in jira-updater(opens new window) .Execute Jenkins Job: Pass in Jenkins build parameters, trigger the specified Jenkins Job execution, the source code is located in jenkins-runner(opens new window) .MySQL Database Change: Execute SQL statement for the MySQL database to realize the linkage change of data and code changes, and the source code is located in mysql-runner(opens new window) .
In addition, a workflow task shared code base is also opened: koderover/zadig-jobs(opens new window) , which contains several demo implementations and scenario descriptions for developers to use and refer to.
